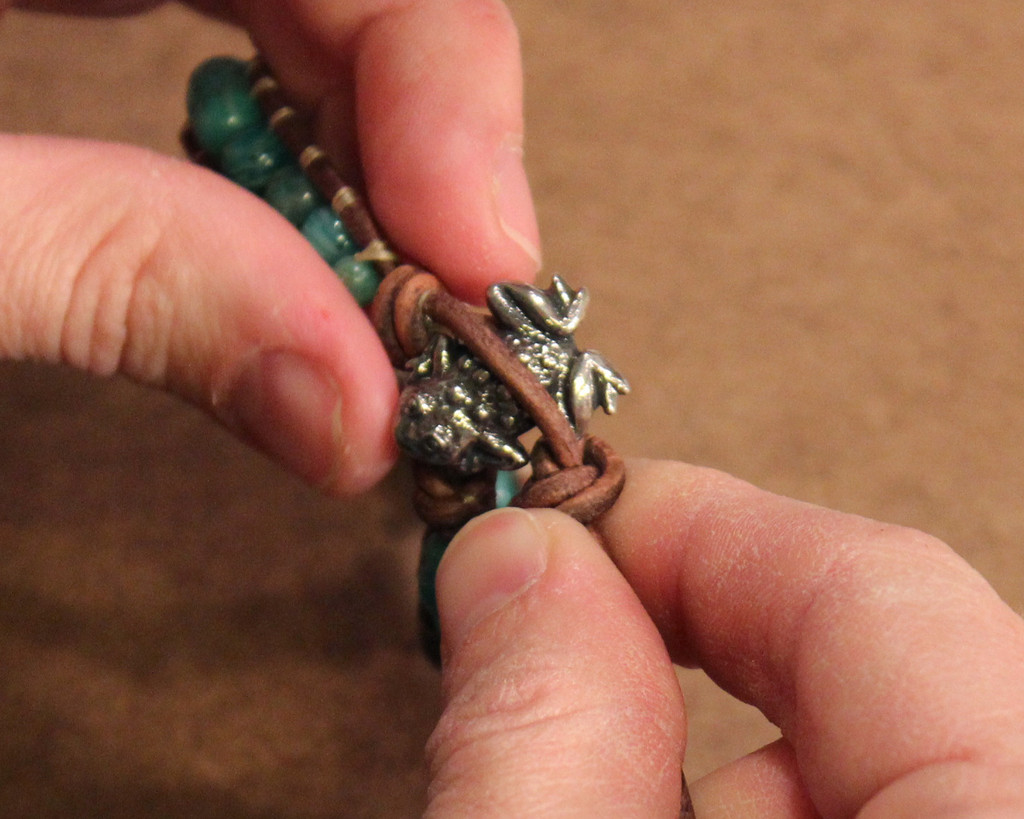
A nyár 10 legjobb csinál magad karkötője :
Ezt az ékszerválogatást a Small for Big oldalán találtam, és igazi telitalálatnak tűnik!
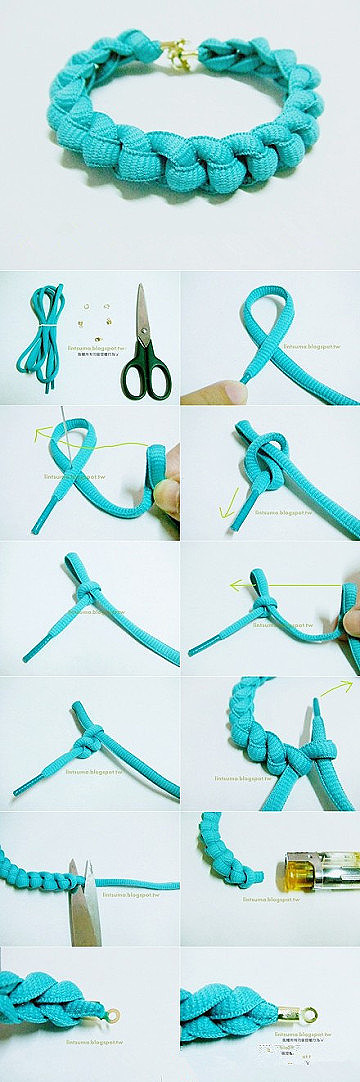
1. Egyszerű csomózás arany árnyalatokkal kiegészítve
Ezt az ékszert akár kezdők is bevállalhatják, nagyon egyszerű összeállítani. Persze mint sok más bizsu, ez a típus is úgy érvényesül igazán, ha több változatot készítünk, és egyszerre viseljük.(a leírás angol de a képek eggyértelműek)
I have very vivid memories of walking into a bead store for the first time, almost 15 years ago, and being overwhelmed by the million and ten ideas that filled my mind. I was immediately hooked on the concept of transforming simple and unexpected elements into something beautiful and wearable. That moment was the catalyst for my eventual path into jewelry design and craft – my higher calling, if you will. Today’s tutorial takes me back to my first foray into jewelry making, where I’ll show you how to make two delightful bracelets using the same basic component. Get inspired and have fun!

For single, adjustable gold tube bracelets, you’ll need:
- a 2mm x 38mm curved noodle tube bead
- 2 feet of 0.5mm chinese knoting cord
- an embroidery needle
- 2 spacer beads

Start by cutting the knotting cord into 2 12 inch pieces. Thread a gold noodle tube bead through one of the strands and cross the ends.

And now, all that’s left is the sliding closure! Similar to our macrame bracelet, fold the 2nd strand over the overlapping ends and start tying square knots. Fold the top cord over the bottom cord . . .

. . . and bring the top cord under both the bottom and middle overlapping strands through the loop, into a knot.

Repeat the same step on the right side.

Continue to make 5-6 more knots.

To finish the knots, thread one of the cords onto a needle and sew up the center of 2-3 knots along the backside. Pliers will help pull the needle through the tight knots.

Trim away any excess cord.

Thread two gold spacer beads onto each cord and tie the tips into a knot. Trim.

Your adjustable & colorful bracelets are done!

For a leather wrap gold tube bracelet, you’ll need:
- 7-8 3mm x 50mm curved noodle tube beads
- 1 yard of 1.5mm leather cord
- 2 crimp on cord ends
- 1 small spring or lobster clasp
- a pair of chainnose pliers

Insert one end of the leather cord into the crimp on cord end. Take a pair of chainnose pliers and squeeze the middle of the end cap to secure the leather cord.

Thread on 7-8 gold noodle tube beads.

Wrap the bracelet around the wrist to gauge the proper length. Trim and crimp on the second end cap.

Using the pliers, open the jump ring connected to the clasp and connect it to one of the end caps.

Wrap, close and your bracelet is complete!

Layer and enjoy.

2. Fonottasok
Ezek is az egyszerűen elkészíthető kategóriába tartoznak, és a lehetőségek száma széles. Bőr- vagy műanyag szállal, textilcsíkkal készítve is mutatós, természetesen trendi nyári színekben!(a leírás angol de a képek eggyértelműek)
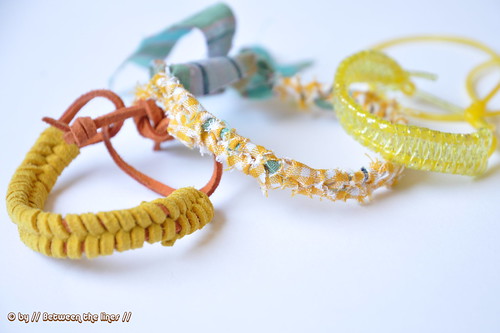
When M. came home from her camp with school, she showed me this yellow bracelet she made with scoubidoo strings. One of her friends taught her how to make these and of course I wanted to have a go at it too. Instead of scoubidou string I used strips of fabric for one and leather - what did you think?!- shoelaces in offsetting colors for another one. I believe both resulting bracelets look really nice. The possibilities in terms of material to braid with are endless. How about tall beach grass or just hemp cord?
So, in case you re in need of a fun summer project heres a how-to in 16 pictures with a short description below. I could probably have done with less photos - its just that I had fun taking pictures...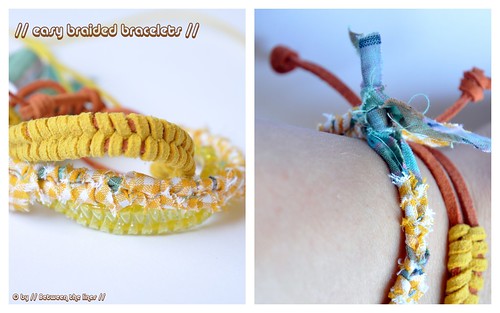
This is what youll need for an adult size leather bracelet. (You might have to adjust depending on the material you use, so make sure to do a try-out before cutting ends.):
- a 52cm long strip of fabric or leather shoe lace
- a second strip of fabric or leather shoe lace of approximately 95 cm
- a big-eyed needle
- a cylindrical object to hold the loop so your project stays put while braiding (the neck of an Elmers glue bottle works just fine; when out on the beach, the finger of a helpers hand might do the trick as well)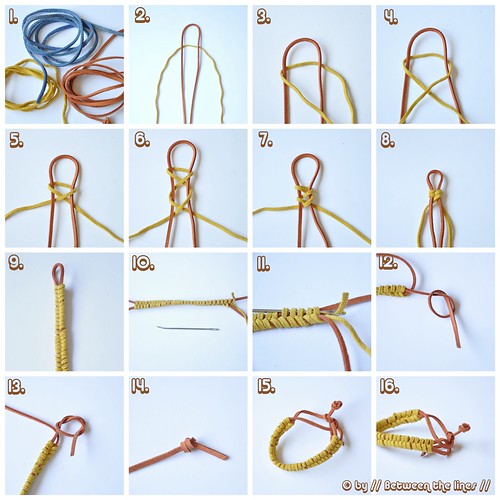
Steps:
1. Fold both strands in half and place the shorter one on top of the longer one as shown in picture 2.
2. Start braiding as shown in pictures 3 through 8, making sure to pull the strings evenly - I made my bracelet really tight but you could make a looser version by pulling less on the strings you braid with.
3. Continue like this until you reach the end of the strands youre braiding with.
4. Hide the loose ends in the braid as shown in pictures 10-11, using a big-eyed needle.
5. Tie a overhand knot in both remaining loose ends as shown in pictures 12-14 and here.
6. Put it around your wrist, pull one of the ends through the loop and (have someone help you to) make a double knot and your bracelet is ready to wear!
This is the kind of craft you could easily do with kids - have them cut strips of fabric, no need to worry about the strips being straight and regular, and teach them how to braid. Its a good exercise for fine motor skills, and because its repetitive its very relaxing too. Use the resulting braid as a bracelet, anklet, key chain, headband... Once youve got the hang of it, or if you want to take this project to the next level, slip some beads on the longest one of your strings before you start and braid them in by slipping them down one by one as you go.
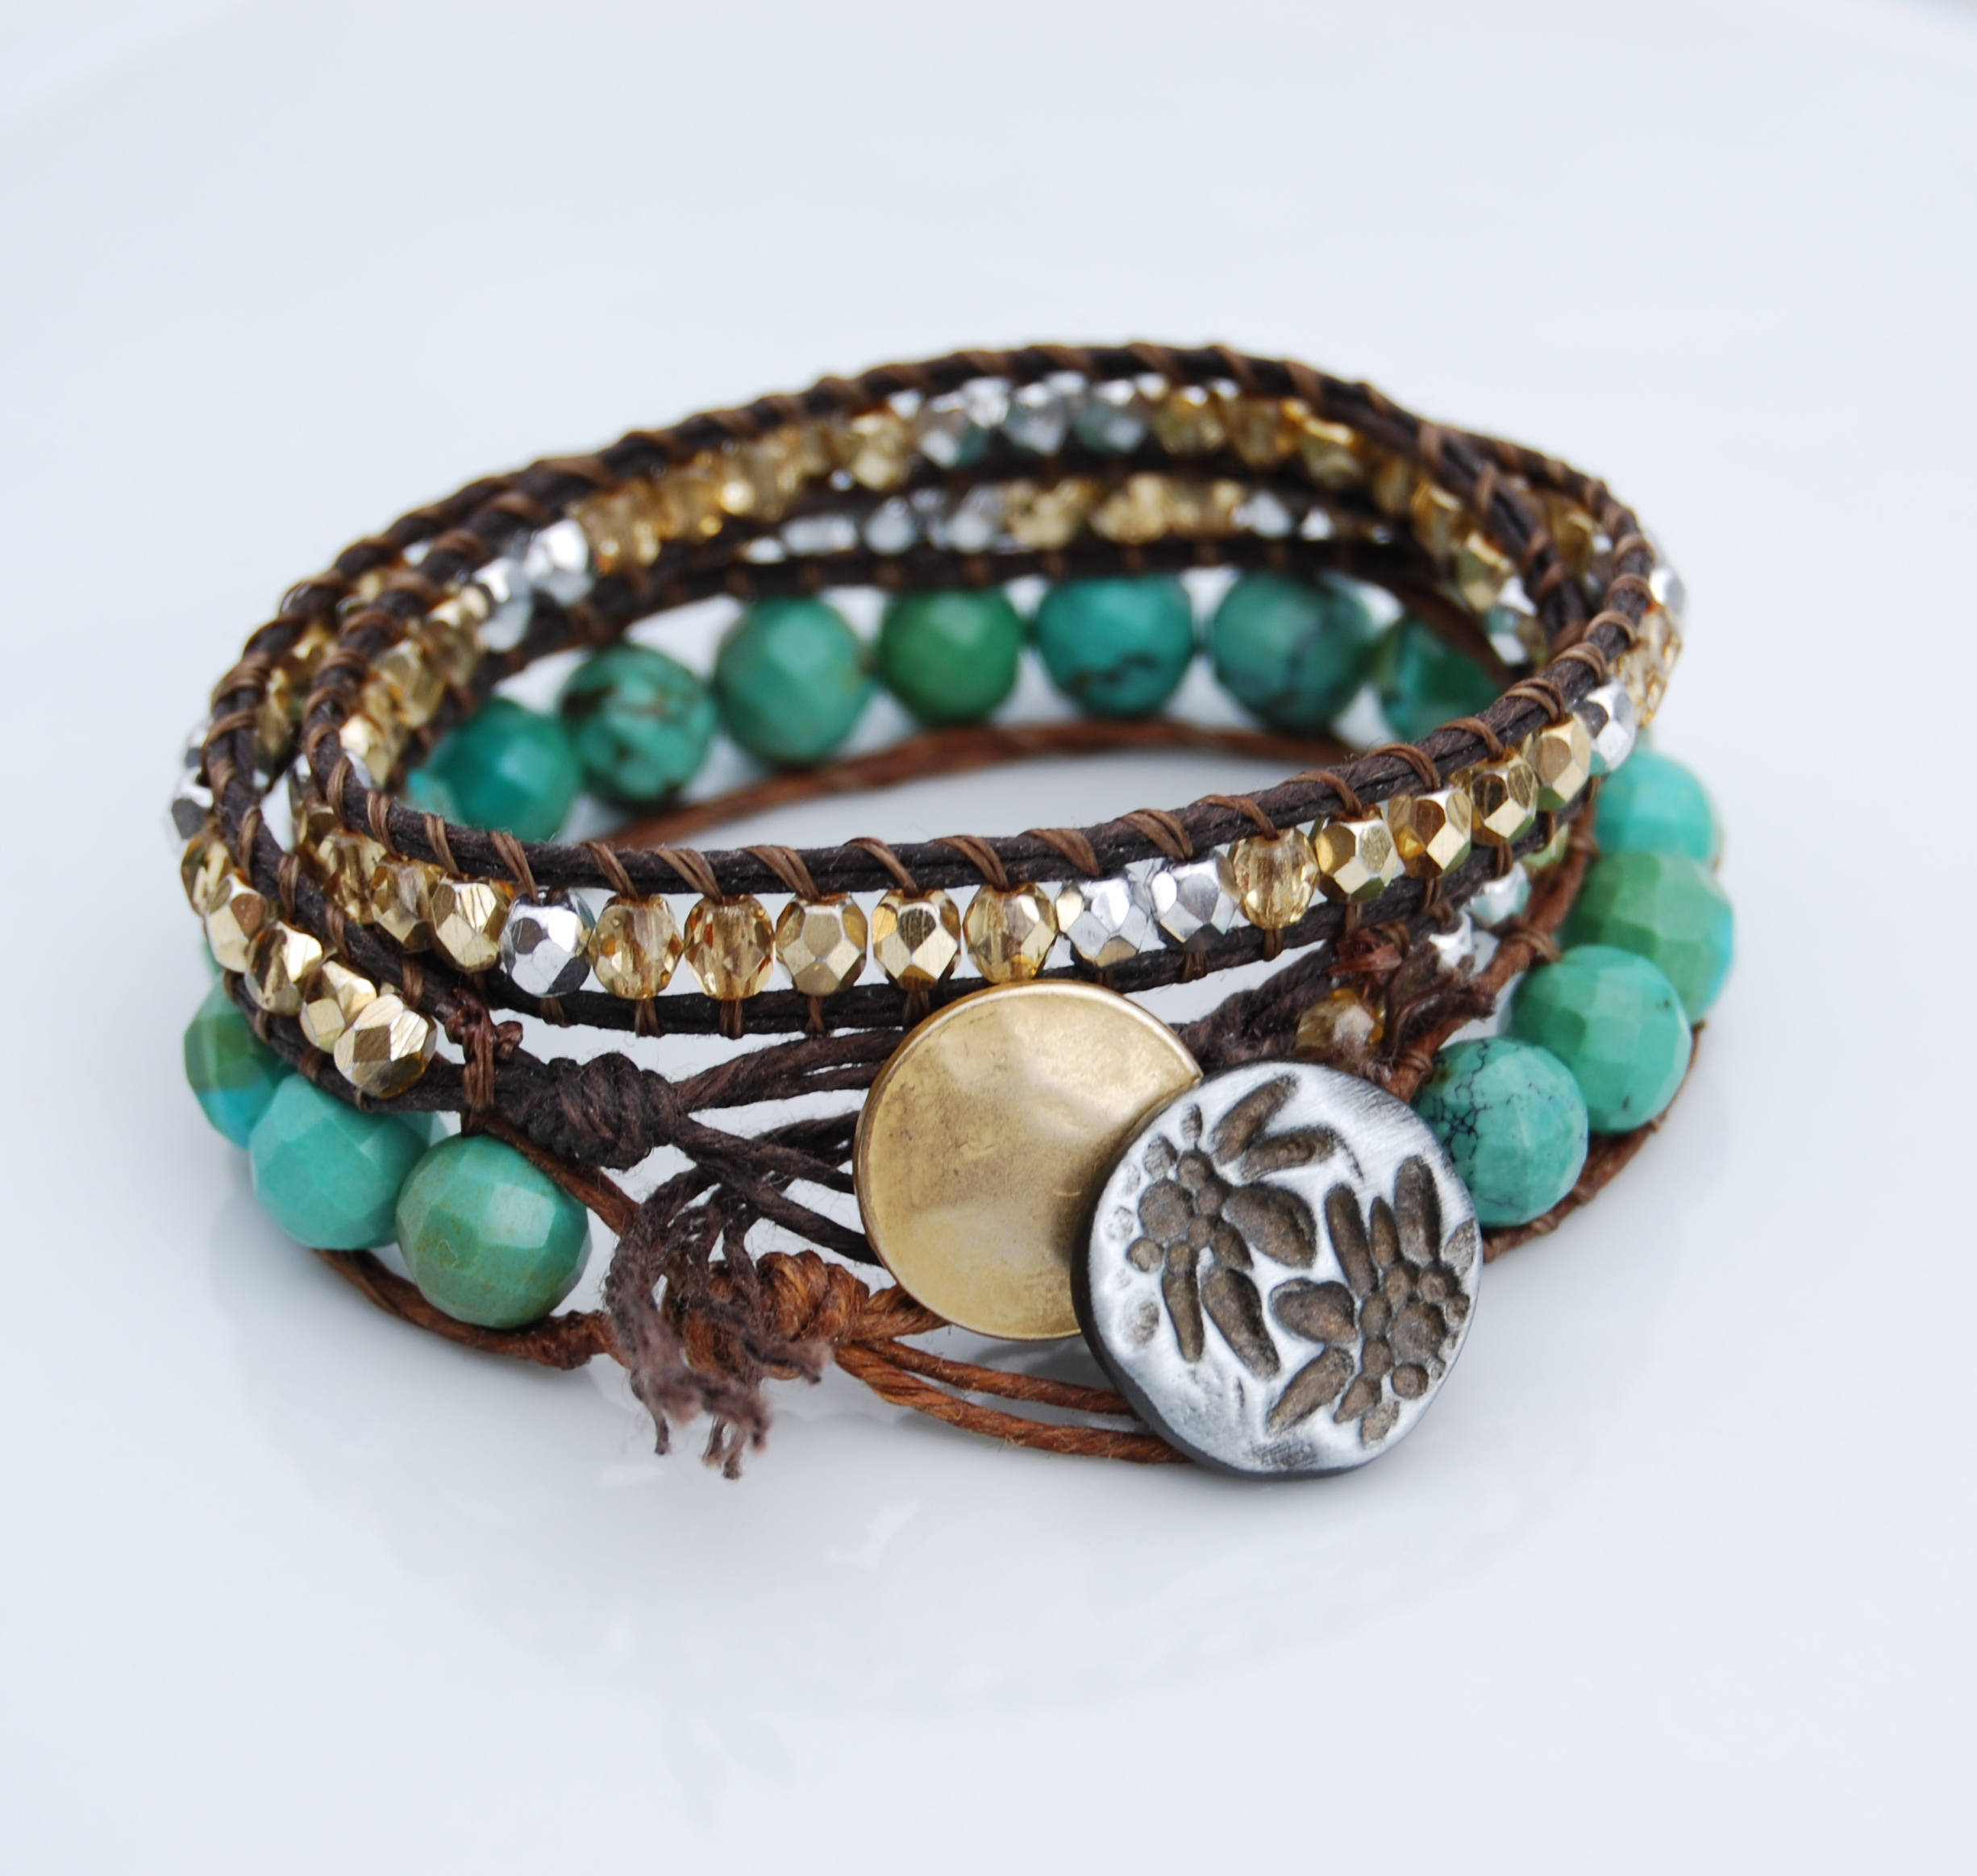
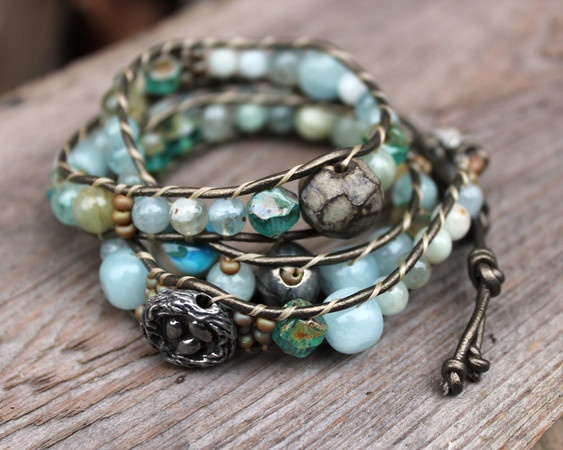
3. Körbe-körbe tekergős
Ez sem bonyolult mutatvány, de türelmet igényel, mert elég monoton munkamenet. Cserébe viszont csillivilli strasszos, gyöngyös karkötőink lesznek!
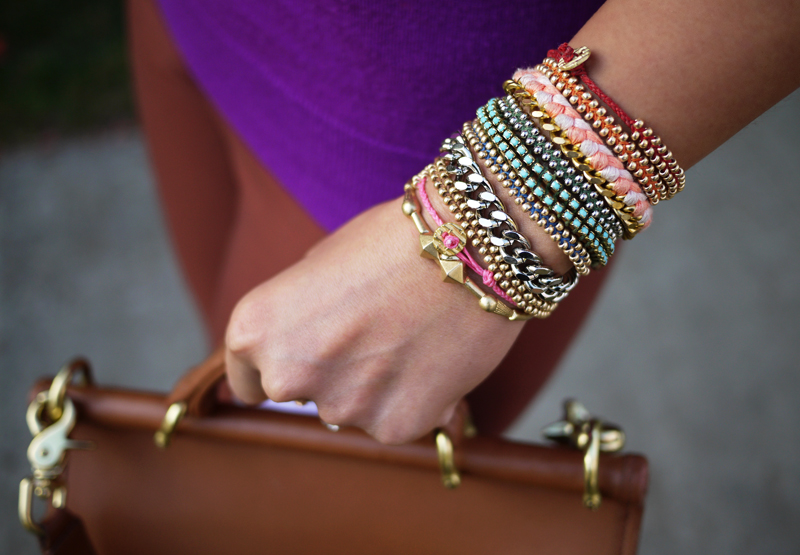
You should all know by now that we are all about stacking bracelets on our wrists. The more, the better. In fact . . . the most, the best! With that being said, we’ll show you how to master a version of the ever so popular wrap bracelet. It’s so simple and addicting, you’ll soon be churning out these wristlets with your eyes closed. Clearly this arm party train isn’t stopping and it’s about time you get on board!

You’ll need (for a double wrapped bracelet) :
- 44-55 inches* of 1.5mm leather cord
- 12-15 inches* of brass ball chain or crystal chain
- 58-72 inches* of waxed linen cord (scroll down in link)
- a 1/4″ brass hex nut
- a pair of scissors
* Lengths will vary depending on the size of your wrist (see comments for suggestions).

Fold the length of leather cording in half to form a loop. The loop should fit around the hex nut, which serves as the clasp. Run the tip of the waxed linen upwards along the leather cord and towards the loop. Then wrap around the base of the loop at least 5-6 times, working downwards in the opposite direction. This secures the waxed linen cord and is the start of the bracelet.

Place the ball chain along the leather cording with the end of the chain meeting the end of the wrap. Holding the ball chain against the leather cord, wrap the linen around tightly.

Continue wrapping while checking it for fit around the wrist.

When you have reached the end of the ball chain wrap the linen cording around the leather strands 2-3 more times. Tie a knot with all three strands.

Thread the hex nut through the strands and tie a second knot.

Trim with scissors and your wrap bracelet is finished!!

The materials are listed for a double wrap bracelet. For a single or triple wrapped bracelet, divide the measurements by 2 and multiply by accordingly. Experiment with crystal or other types of chain!

It’s a party!

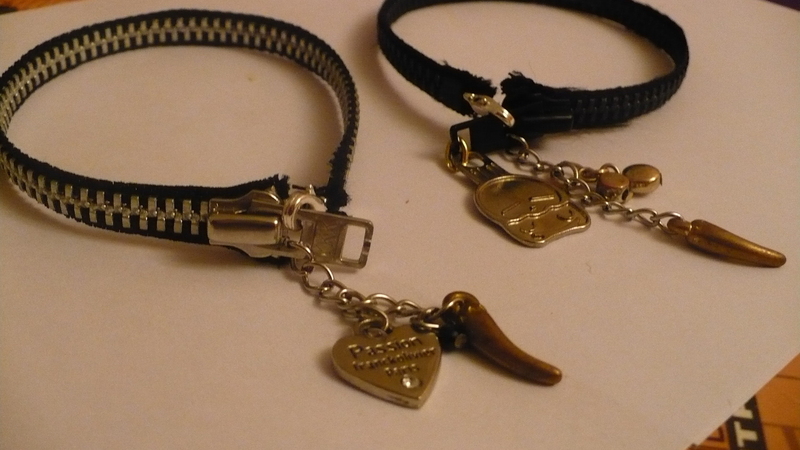
4. Cipzáros karkötők
A cipzáros megoldások nem maradhatnak ki egy ilyen válogatásból, legyenek ilyen egyszerűbb fazonú, vagy nehezebben elkészíthető darabok. Néhány vidám fém kiegészítővel is feldobhatjátok, igazi fesztiválékszer!
5. Anyacsavaros megoldás
Ha különleges és bevállalós darabra vágytok, ezt nektek találták ki!

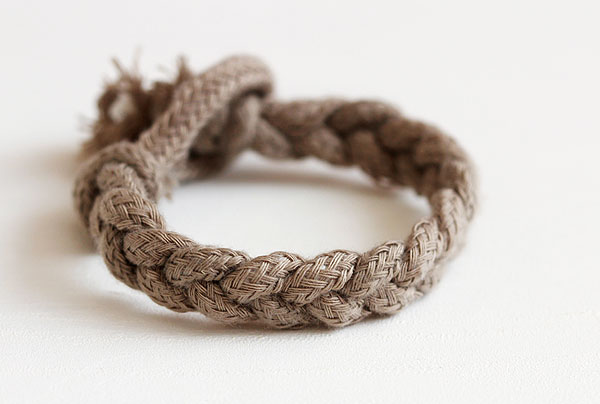
6. Tengerész stílushoz
Ez a stílus sosem kopik ki a divatból, így a kiegészítőnkben is visszaköszönhet. Például ebben vastagabb kötélből font karkötő esetében is.
7. Etno szerelés
Nekem ez az ékszer a kedvencem, színei és bohókás kinézete miatt is.

Irish Linen Sparkly Wrap Bracelet Tutorial

Beaded Wrap Bracelet – Waxed Irish Linen Tutorial


8. Fonós-fűzős
Ezek is igazi nyári viseletek, és milyen klasszul mutat ennyi egymás mellett!

You’ll need:
- 1.5 yards of waxed linen cord
- 50 – 70 size 8/o seed beads
- a 10-13mm two hole button
- scissors

Cut the waxed linen cord into a 26″ and 19″ piece. Fold the longer strand in half. Align one end of the shorter strand with both ends of the longer strand. Fold the excess over the top of the folded piece creating two parallel loops. (Click images to enlarge)

Tie a knot about half an inch down from the loops. Snip off the extra fourth strand, leaving 3 equal strands of equal length.

Start braiding the strands. After about an inch or so, braid in the beads. Thread a bead onto the outer left strand.

Push the bead against the base of the braid, and cross the left strand over the middle. Now thread another bead onto the outer right strand. Push it to the base of the braid and crossover.

Keep a finger at the base of the braid, holding the beads in their place and keeping the braid tight. Continue threading on beads before each strand is crossed over.

Finish the bracelet with another inch of braided cord, measuring it against the wrist. Tie a knot.

Thread on a two hole button – two strands through one hole and one strand through another. Secure it with another knot.

Trim the end.

Your bracelet is finished! Try using different colored waxed linen and beads.


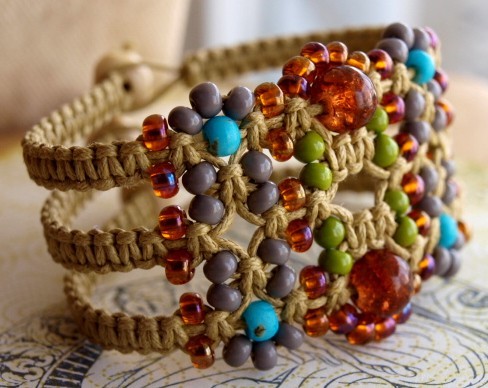
9. Modern makramé
A makramé sokaknak a nagyanyáink idején divatos virágtartókat juttatja eszébe, pedig napjainkban reneszánszát éli. Néhány fém kiegészítővel egész más hangulatot árasztanak...
Growing up by the beach in Southern California, the ability to knot a macrame bracelet was practically a right of passage. Although those days are long behind us, we’ve never forgotten the ever-so-simple square knot technique. This time, however, we’re replacing hemp and wooden beads for more updated elements like colorful nylon cord and glossy metal charms. Happy knotting!

You’ll need:
- 4 yards of 0.5mm chinese knotting cord
- a connector or charm
- an embroidery needle
- a pair of scissors
- flat nose pliers (optional)
- a lighter (optional)

Start by cutting the knotting cord into two 30 inch, two 20 inch and one 10 inch lengths. Fold the 20 inch piece in half, pull the loop through the ring, fold it over the ring, and pull the rest of the cord through the loop. Repeat the step on the other side of the ring. These strands will be anchored and remain stationary.

Center the 30 inch cord under the two middle strands. Fold the right cord over the middle strands and under the left cord. Pull the left cord under the right and middle strands and through the loop on the right side.

Pull tightly and slide the knot up to the top.

Finish the 2nd half of the square knot by folding the left cord over the middle strands and under the right cord. Pull the right cord under the left and middle strands and through the loop on the left side.

Pull tightly and repeat the steps – left, right, left, right . . . Continue knotting until the desired length is reached. Keep in mind that the clasp will take up approximately half an inch.

To finish the knots, thread one of the cords onto a needle and sew up the center of 3-4 knots along the backside. Pliers will help pull the needle through the tight knots.

Repeat the same step on the other cord.

After sewing up both knotting cords, trim away any excess. Save the scraps and melt the tips with a lighter to seal it for extra hold. Repeat the same exact step on the second half of the bracelet.

To make a sliding closure, shape the bracelet into a circle and overlap the middle strands. Use scraps to temporarily tie the cords together at each end.

Take the 10 inch cord and center it under the strands. Start tying square knots exactly the same way the bracelet was executed.

Stop at about half an inch and sew the knotting cords into the backside of the closure. Remove the temporary ties.

The two sets of middle strands are now the adjustable ties of the bracelet. Adjust to fit the wrist and tie each end into knots. Trim away any excess.

Your adjustable knotted bracelets are finished!! xx

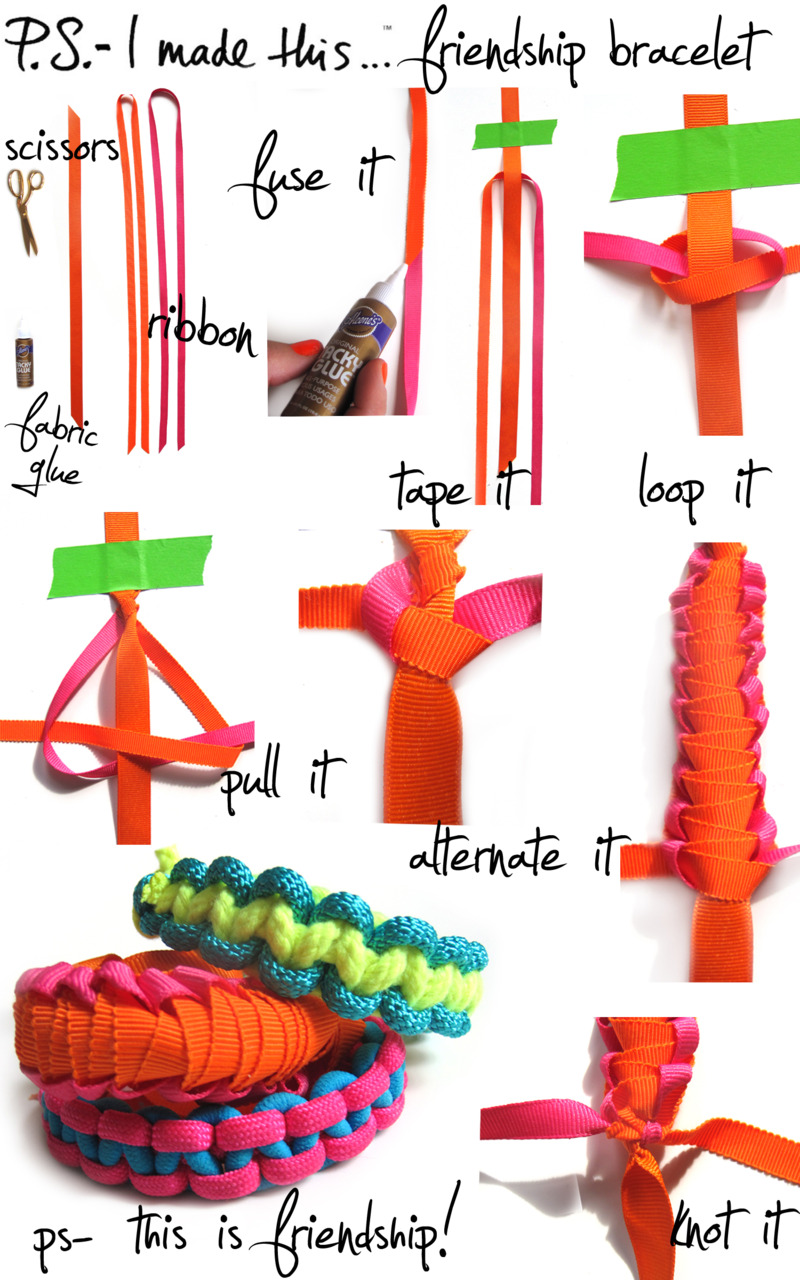
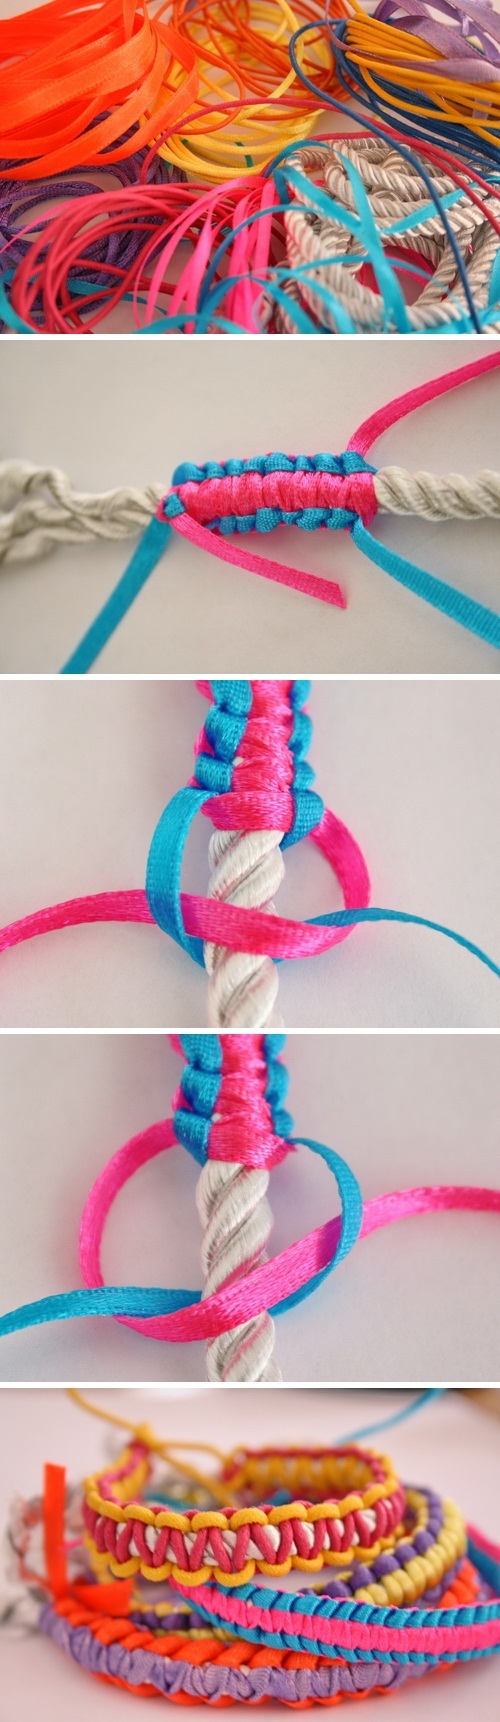
10. Barátság karkötők
Ezek elsősorban kiskamaszok körében népszerűek, de az ő körükben viszont nagyon.
Nagyon nyári karkötők csomozással, fonással :
A nyári öltözékeinkhez bátran viselhetünk vidám, színes kiegészítőket, és ez különösen igaz a saját kezűleg készített darabokra, amelyeknek nagy előnye, hogy színűket és stílusukat is tökéletesen a ruhánkhoz passzíthatjuk. Remélem, találtok kedvetekre valót!

Az egyszerű csomózást élénk színű szalagok használatával tehetjük hangsúlyosabbá, ugye milyen látványos?
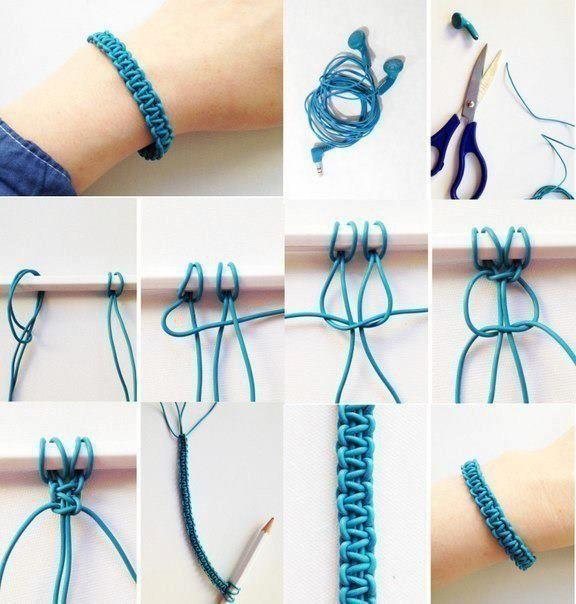
A csomózásnak nagy előnye, hogy rengetegféle szalagot/zsinórt/fonalat felhasználhatunk hozzá, nincs semmilyen extra anyagigénye, megteszi bármilyen maradék (akár még spárga, cipőfűző, vagy ahogy az alábbi képen is láthatjátok, akár egy régi fülhallgató is). Rövidáru üzletekben pedig hatalmas választékot találhattok hímzőfonalakból, szaténszalagokból, selyemzsinórokból, ezek mind alkalmasak csomózáshoz.
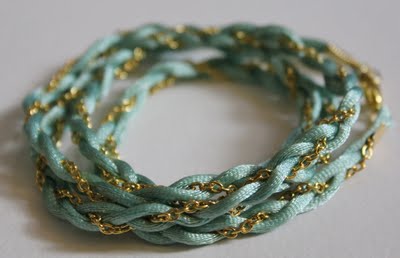
A hármasfonás még a csomózásnál is egyszerűbb, kombinálhatjátok egy régi bizsulánccal is!
A makramézással nem csak virágtartókat, hanem ékszerek is készíthettek.
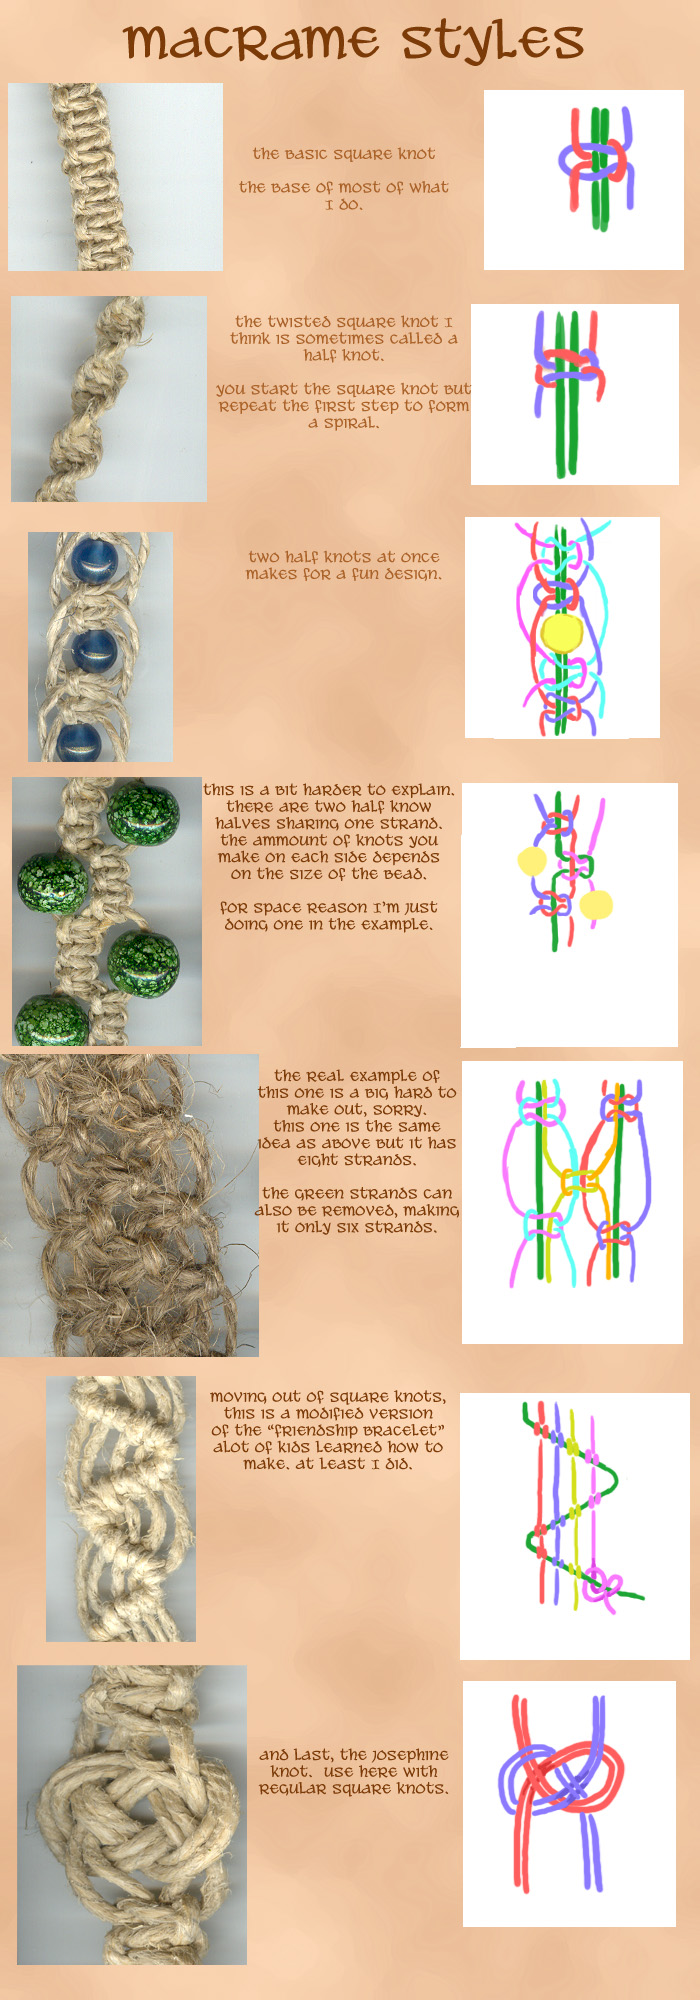
Mostanában többször is téma volt a blog Facebook oldalán a makramé technika, és többen is kértetek útmutatót a technika elsajátításához. Manapság már nem csak nagyanyáink porosodó virágtartóira kell gondolnunk, ha makraméról beszélünk, hiszen reneszánszát éli a csomózás, ékszerek terén különösen tetszetős darabokat vadászhatunk a neten. Én lőttem is néhány gyönyörű példányt, de persze útmutatókat is kerestem, hogy el is tudjuk készíteni.
Egy kis időbe beletelt ugyan, de megtaláltam a legérthetőbb és legátfogóbb ábrát. Itt megtaláljátok az általános csomófajtákat, és a végére még néhány trükkösebb változatot is, és úgy gondolom, nem szükséges kísérőszöveg sem, mert a képeken nagyon jól látszik minden.
Találtam egy szupergyorsan elkészíthető csomózott karkötőt, elkészíthetitek cipőfűzőből vagy bármilyen vastagabb zsinórból (akár régi kabátból kiszuperált húzózsinórral is), illetve ékszerzsinórral is.
Az ombre, azaz színátmenetes stílus nem csak a hajfestés terén és az öltözködésben hódít, hiszen akár ombre ékszert is készíthettek!
Az alábbi képsor részletesen szemlélteti eme látványos ékszer elkészítését, remélem, sokan hasznosnak találjátok majd!

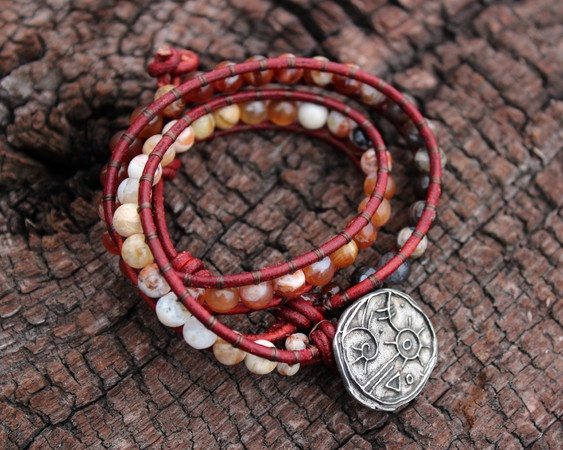
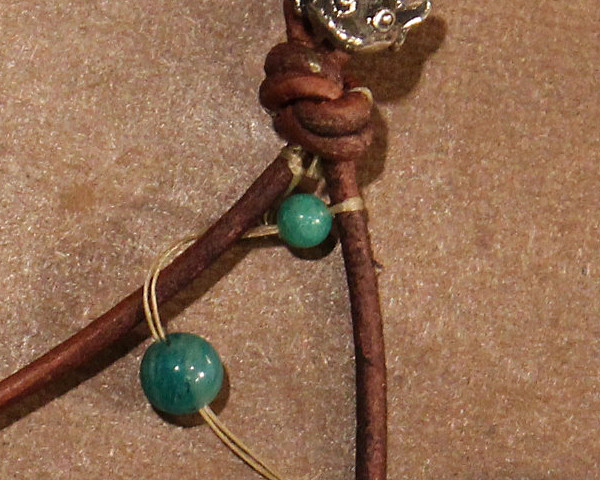
Gyöngyös karkötő őszre :
Nagyon sok helyen találkozom ezzel az ékszerkészítési technikával mostanában, titka az egyszerűségében és a gyors elkészíthetőségében rejlik. Az ősz pompázatos színeiben fantasztikusan mutat, és nagyon könnyű rákattanni erre a technikára, szóval nehéz lesz egynél megállni.
Anyagok:
- Nagyobb méretű, egyedi gyöngyök, vagy amilyen akad otthon (tekla, csiszolt gyöngy, vegyes gyöngyök stb.)
- Gyöngyfűzőcérna
- Gyöngyfűzőtű
- Bárszál vagy ékszerzsinór
- Fém díszítőelemek (gomb)
Elkészítés:
A bőrszál/ékszerzsinór felénél rögzítsétek a fém gombot (vagy egy olyan díszítőelemet, ami megfelel erre a célra). Egy egyszerű csomóval zárjátok le. Így két egyenlő hosszúságú fűzőszálatok lesz. A gyöngyfűzőcérna végét rögzítsétek a csomóhoz.
Most kezdődhet a gyöngyfűzéses szakasz. A kép alapján szerintem, egyértelmű a technika. Ha mégis elakadnátok, kattintsatok a képre, a forrásoldalon találtok egy remek videót is.
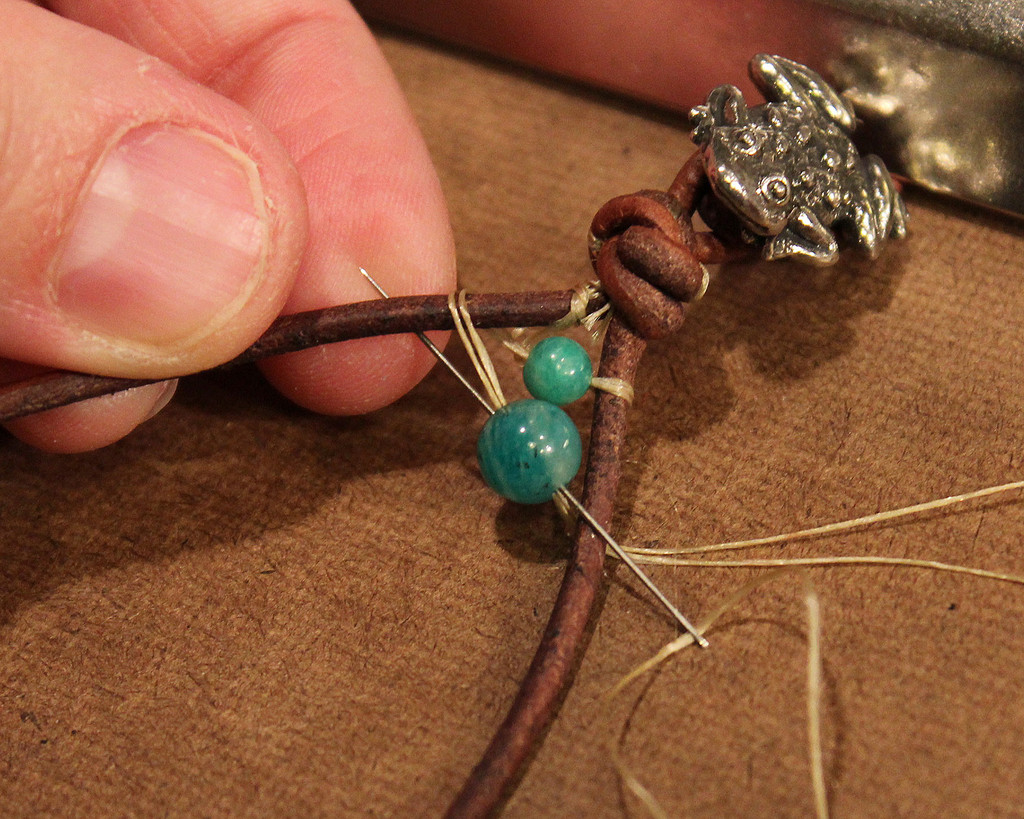
A kívánt hossz eléréséig mehet az oda-vissza öltögetés.

A bőrszál/ékszerzsinór végére kössetek akkora hurkot, hogy átférjen a fém gombon. Dolgozzátok el a gyöngyfűzőcérnát is.
Variációk a témára: